Blueprint plots, scenes and timeline
Blueprint is where the story's shape lives. It has two tabs on the left: Plots, a set of boards where you lay out turning points and connect them, and Scenes, the list of scenes in the book with a timeline that places each one in a chapter. Open it from the top bar or press ⌘ 4 (Ctrl 4 on Windows).
Plots
The plot list
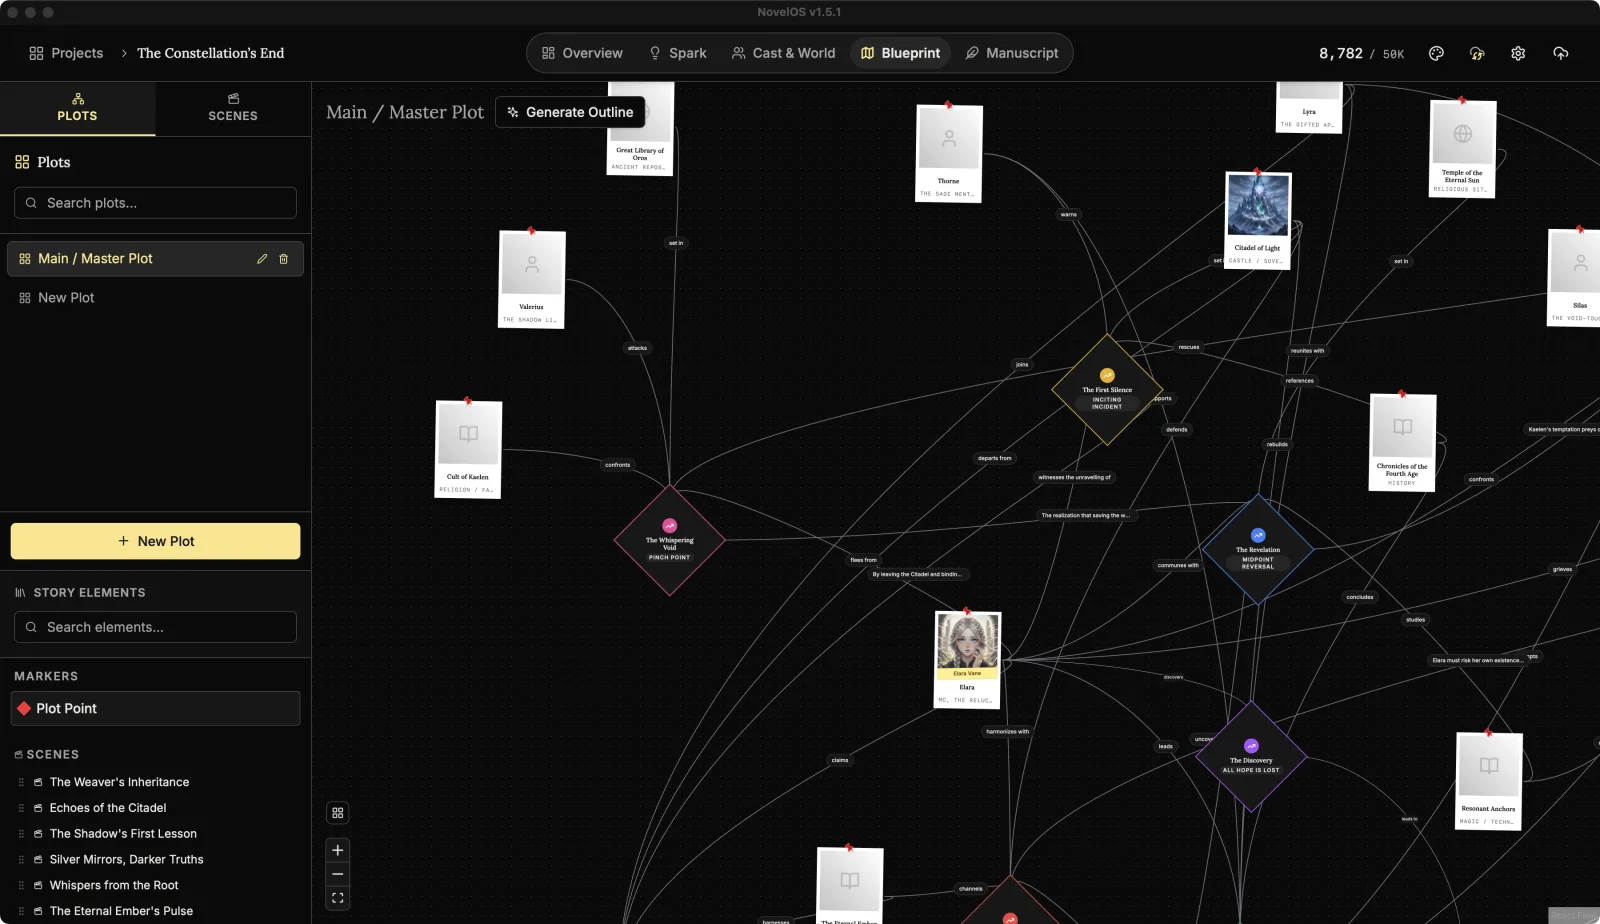
Under Plots is the list of plot boards. Use one for the main plot, another for the romance subplot, a third for the heist you haven't decided to keep.
- New Plot adds a board, named "Untitled Plot 2" and so on, and opens it.
- Search plots... filters the list.
- Hover a board for Rename (the pencil; press Enter to keep the name) and Delete (the bin, then the tick to confirm).
New Plot is in the command palette too.
Story elements
Below the list, Story Elements holds everything you can drag onto the board. Search elements... narrows it down.
- Markers: a Plot Point, for a turning point in the story.
- Scenes: every scene in the book.
- Cast, World and Lore: your characters, places and lore from Cast & World.
Drag one onto the board and a card appears where you let go. A character card shows their name, picture and role; a place or lore card shows its name and type.
Add cards with a right-click
Right-click an empty part of the board. Add to Plot offers:
- Scene Card: makes a new scene in the book and puts its card here. You stay on the board.
- Plot Point: a new turning point.
- Sticky Note: a note with a title and plain text. It isn't a scene; it's for "check whether the horse can actually swim that far".
The board says Board Empty until it has a card.
Connect cards
Every card has handles on its edges. Drag from one card's handle to another card to draw an arrow between them. Each arrow has a Relation label in the middle: click it, type how the two are linked ("betrays", "leads to", "hides the key in"), and click Save or press Enter. The × in the same box deletes the arrow. You can also click an arrow and press Delete or Backspace.
Card details
Click a card to open its details on the right.
- A scene card shows the scene's title, its story time and synopsis. Edit View opens the scene itself. The card is read only on the board; "Editing locked" is there to remind you the scene is the place to change it.
- A plot point has a Label, a Key Turning Point type with a description of what that beat does, Tags and a Description.
- A sticky note has its title and its text.
| Key Turning Point | What it is |
|---|---|
| Inciting Incident | The event that sets the story in motion and disrupts the status quo. |
| Crossing the Threshold | The point of no return, where the hero commits. |
| Pinch Point | A reminder of the antagonist's power or the stakes, forcing a reaction. |
| Midpoint Reversal | A revelation that turns the protagonist from reactive to proactive. |
| All Hope Is Lost | The lowest point, where the goal seems impossible. |
| Climax | The final showdown that decides the outcome. |
| Resolution | The consequences play out and a new normal settles in. |
| Custom Beat | Any other turning point. |
Right-click a card
Right-clicking a card opens Options:
- Disconnect removes every arrow to and from the card. It only shows when the card has some.
- Delete Scene, Delete Plot Point, Delete Sticky Note or Delete Entity (for a character, place or lore card) removes the card from this board.
Deleting a scene card or a character card from a board only removes the card. The scene stays in the book and the character stays in your cast. The details panel has the same delete as Delete Node, with Confirm delete.
Tidy Up and zoom
Once a board has two or more cards, Tidy Up (the grid button in the lower left) lines them up in a grid and fits them on screen. The zoom controls next to it zoom in, zoom out and fit the whole board in view.
Generate Outline
Generate Outline, next to the board's name, asks the AI for a three-act outline built from your book's synopsis (or logline, if there's no synopsis), its genre and its language. It looks at your cast and world and at what's already on the board, then adds:
- plot points in three rows, one per act (Act 1: Setup, Act 2: Confrontation, Act 3: Resolution), each with a type and a short synopsis;
- arrows from one beat to the next, labelled with how the stakes go up;
- cards for the characters, places and lore each beat involves, linked to it. A character already on the board gets reused, not duplicated.
It adds to the board and leaves what's there alone. It needs a Muse key, and a synopsis or logline on the Overview gives it something to work with.
Scenes
The scene list
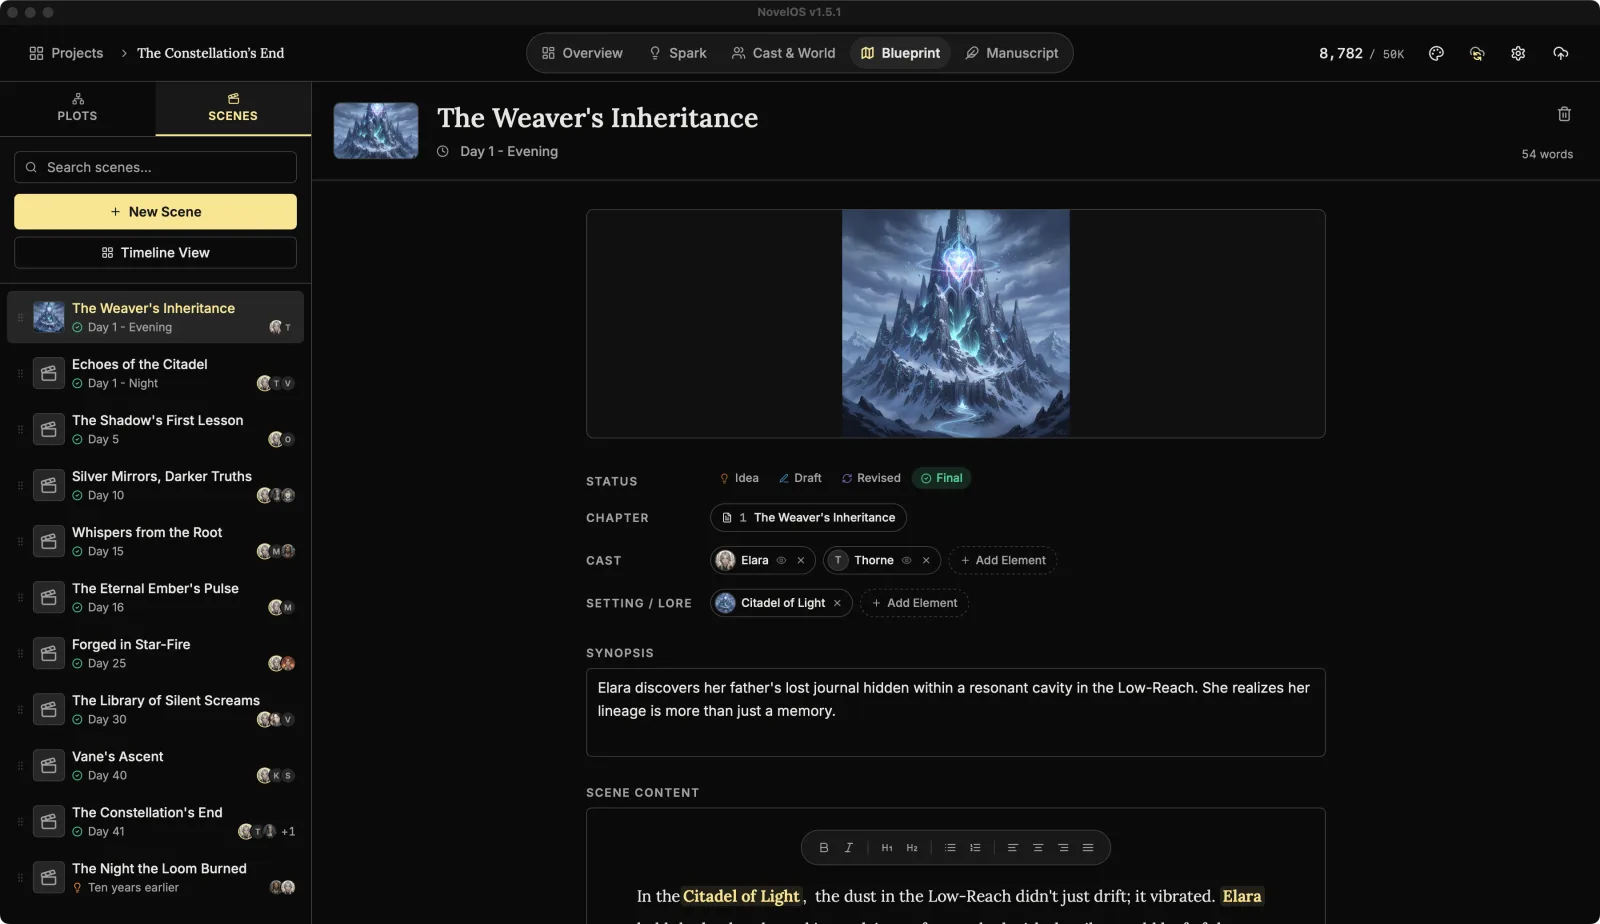
The Scenes tab lists every scene in the book, in order. Each row shows the scene's picture, title, a status icon, its story time, and the faces of its cast, with the viewpoint character picked out.
- New Scene adds a scene and opens it. From anywhere in the book, ⌥ ⌘ S (Ctrl Alt S on Windows) does the same.
- Search scenes... filters the list.
- Drag a scene by its grip on the left to change the order.
- Click a scene to open it.
When the book has no scenes yet, the list says so and suggests adding one.
Write a scene
A scene has:
- A picture: click the square at the top left to upload one, or to replace it. The picture also shows larger further down; hover it for the button that removes it.
- Scene Title, and the story time ("Morning", "1920", "The Final Hour"; whatever your calendar is).
- Status: Idea, Draft, Revised or Final. Each has its own colour and icon, used everywhere the scene appears.
- Chapter: which chapter of the book the scene is written in. Several scenes can share one. Scenes that aren't in any chapter go under Outside the book:
| Outside the book | Means |
|---|---|
| Unplaced | Not given a chapter yet. |
| Backstory | Happens before or beside the story, not told in a chapter. |
| Cut scenes | Taken out of the book, kept in case. |
| Reference | Kept for your own reference only. |
- Cast: click Add Element and pick from Select Cast Members. Click a character's chip to make them the Viewpoint character; click again to undo.
- Setting / Lore: Add Element opens Select Setting / Lore, for the places and lore in the scene.
- Synopsis: one sentence about what happens.
- Scene Content: the full editor, for drafting the scene or keeping notes about it.
The word count of the content shows at the top right. The bin above it is Delete Scene, which asks once more with a tick.
Characters, places and lore you tag here show up under Linked Scenes on their own pages in Cast & World.
Timeline
Timeline View, under New Scene, swaps the scene editor for a timeline of every scene. Click Close Timeline to go back.
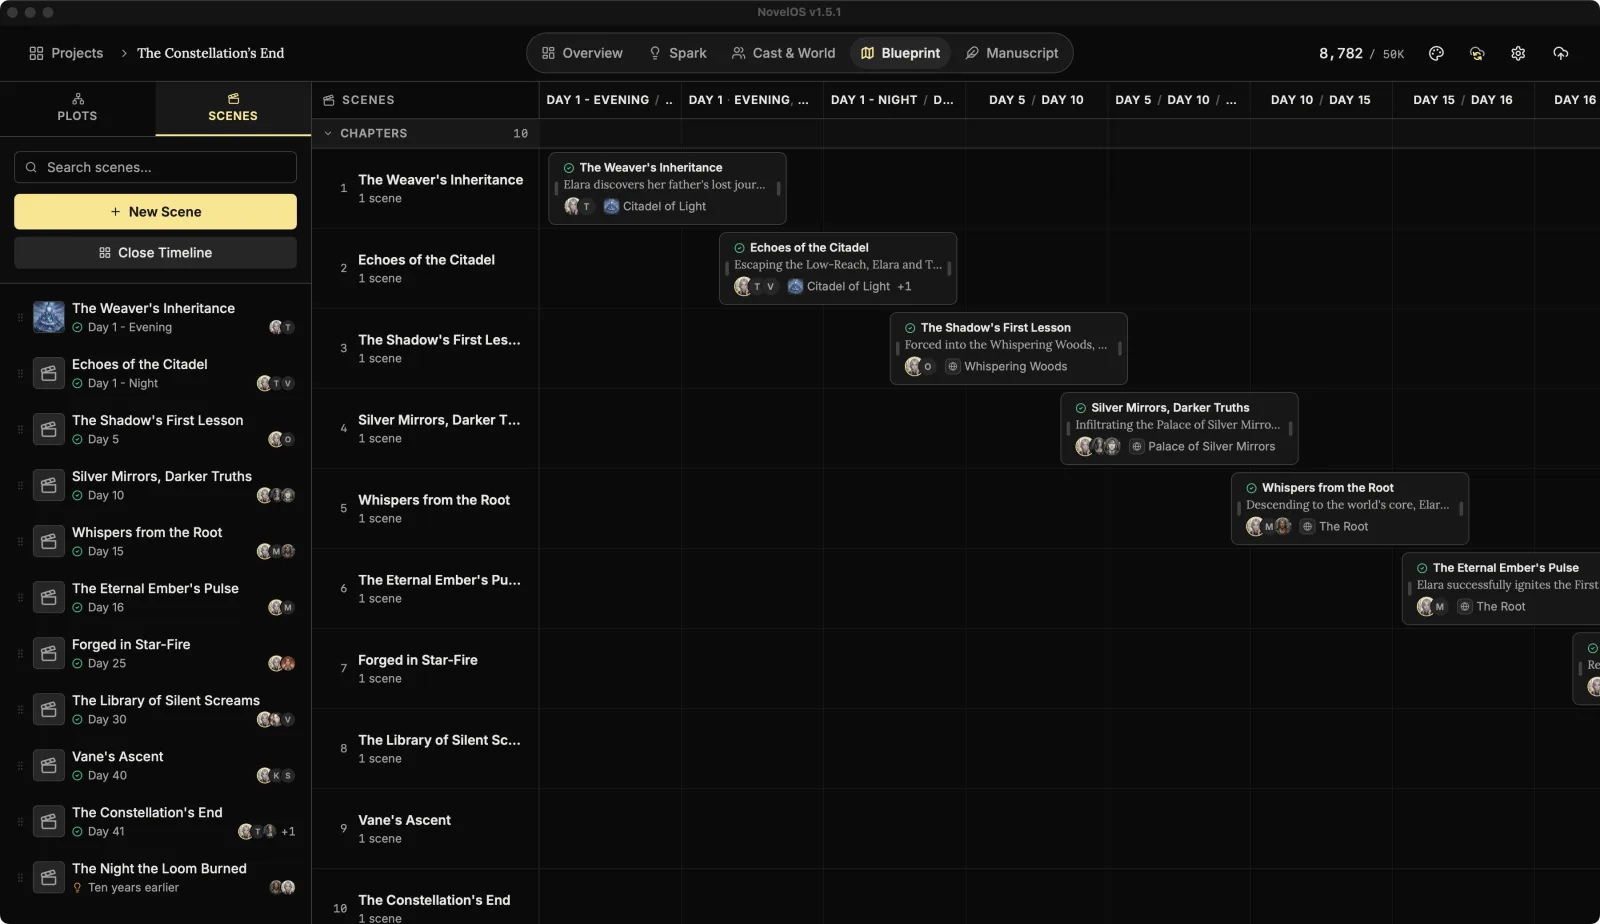
Each row is a chapter, in book order, with a count of its scenes. A second group, Outside the book, holds the Unplaced, Backstory, Cut scenes and Reference rows. Click a group's heading to fold it away. If none of your scenes have a chapter yet, the chapter group starts folded, so you don't open on a wall of empty rows.
Columns are named after the story times of the scenes in them, not after dates, so "Dawn" and "Day 3" are fine. Each scene bar shows its status, its title and who's in it.
Drag scenes on the timeline
- Drag a bar sideways to move the scene earlier or later.
- Drag a bar to another row to move the scene into that chapter, or out of the book.
- Drag either end of a bar to stretch it over more time, or shrink it.
- Click a bar without dragging to open the scene.
With no scenes at all, the timeline reads Timeline Empty.
Related
Checked against NovelOS Studio 1.5.1 · Updated · View as Markdown